![Cario logo RGB blue-1.png]](https://knowledge.cario.com.au/hs-fs/hubfs/Cario%20logo%20RGB%20blue-1.png?height=50&name=Cario%20logo%20RGB%20blue-1.png)
.
When a ticket is created, Cario can automatically include useful diagnostic information such as:
- A screenshot of the current Cario screen
- Recent system error logs
- The page or process being used when the issue occurred
- Additional documents, images or videos uploaded by the user
This helps Cario Support understand the issue more quickly and reduces the need for repeated emails requesting screenshots or technical information.
Who should use the Cario ticketing system?
The ticketing system can be used by Cario users who need to report a system issue or request assistance from Cario Support.
It is particularly useful for:
- Dispatch and warehouse users
- Customer service teams
- Cario administrators
- Finance and freight review users
- Onboarding and implementation teams
- Users encountering an error while creating or managing a consignment
When should you create a ticket?
Create a ticket when you experience an issue that requires investigation by Cario Support.
Common examples include:
- An error appears while creating a consignment
- A quote cannot be calculated
- A carrier service is not available
- A label or document is not generated
- A consignment cannot be updated or deleted
- A page does not load correctly
- Information displayed in Cario appears incorrect
- A system process does not work as expected
Where possible, create the ticket while the error message is still displayed. This allows Cario to capture a screenshot of the issue and attach it to the ticket.
Example: Reporting an Error While Creating a Consignment
In this example, a user is creating a consignment and accidentally enters shipment dimensions or weights that are not valid.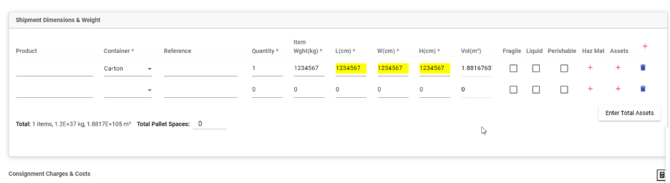
The incorrect values cause Cario to display an error message.
Instead of closing the message and sending a separate email, the user can create a support ticket directly from the same screen.
How to Create a New Support Ticket Step 1: Leave the error message on the screen
When the error appears, do not close the message immediately.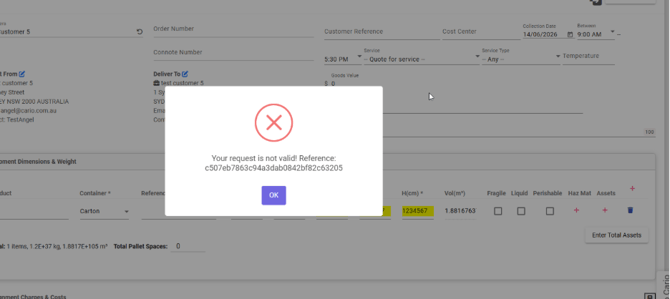
Leaving the error visible allows the ticketing system to capture a screenshot showing exactly what occurred.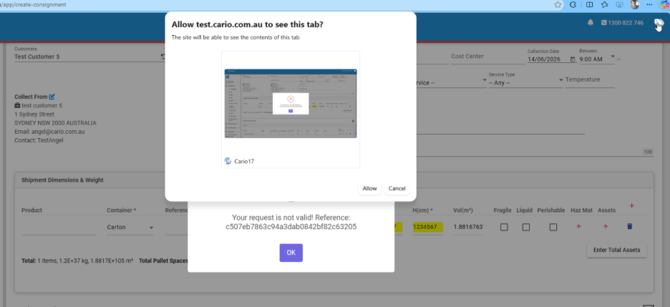
This can provide Cario Support with important context, including:
- The error message
- The page being used
- The shipment information entered
- The action being performed when the error occurred
Tip: Remove or hide any information that should not be included before taking the screenshot.
Step 2: Open the Tickets window
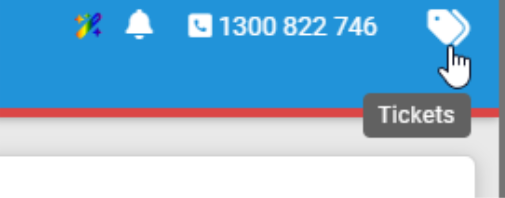
Click the Tickets icon in the top-right corner of Cario.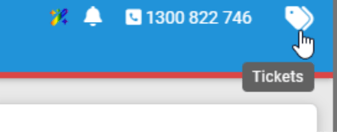
The icon appears as a ticket-shaped symbol in the Cario header.
Your existing tickets will be displayed, including information such as:
- Ticket ID
- Title
- Date created
- Created by
- Current status
- Status date
You can use the available filters to display:
- Only tickets created by you
- Only open tickets
- Tickets within a selected date range
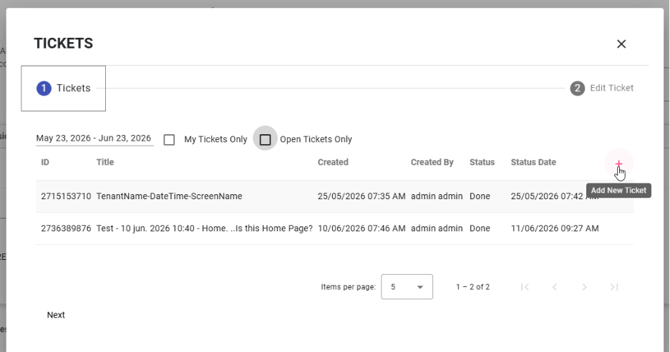
Step 3: Click Add New Ticket
Click the plus icon on the Tickets screen.
The Add New Ticket window will open.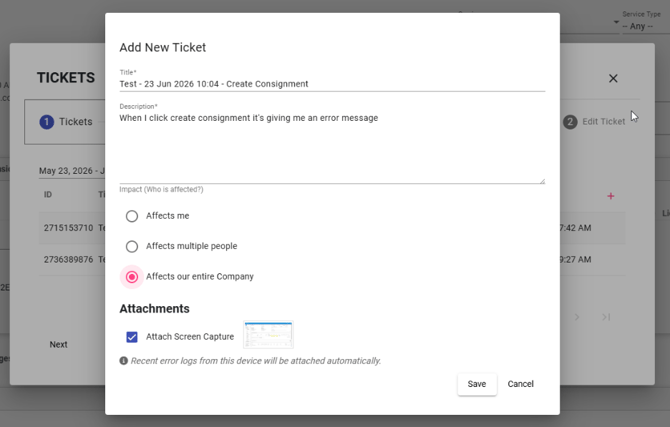
Step 4: Enter the ticket details
Complete the following fields.
Title
Cario may automatically generate a title based on the current page, date and time.
Review the title and update it if required.
A useful title should briefly describe:
- The process being performed
- The affected Cario screen
- The issue encountered
For example:
Create Consignment – Error displayed when requesting quote
Avoid using general titles such as:
- Help
- Not working
- Error
- Urgent issue
A clear title helps Cario Support identify and prioritise the issue.
Description
Describe what happened and what you were attempting to do.
Include information such as:
- The process you were completing
- What you expected to happen
- What occurred instead
- The error message displayed
- Whether the issue affects one user or multiple users
- Whether the issue can be repeated
Example:
When I click Create Consignment, Cario displays a “Your request is not valid” error. The error occurred after entering the shipment dimensions and requesting a carrier quote.
Impact
Select the option that best describes who is affected:
- Affects me
- Affects multiple people
- Affects our entire company
Choose the most accurate option available. This helps Cario Support understand the business impact of the issue.
Step 5: Review the attached screenshot
When Attach Screen Capture is selected, Cario will attach a screenshot of the current browser tab.
Review the screenshot preview before submitting the ticket.
The screenshot should show the relevant error or page wherever possible.
If the browser asks for permission to share the Cario tab:
- Select the Cario tab shown in the browser window.
- Click Allow.
- Return to the ticket window.
The captured screenshot will then be attached to the ticket.
Step 6: Save the ticket
Click Save.
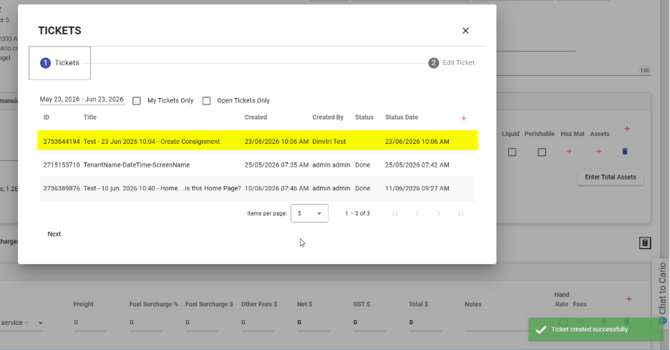
A confirmation message will appear in the bottom-right corner of Cario confirming that the ticket was created successfully.
The new ticket will also appear in the ticket list.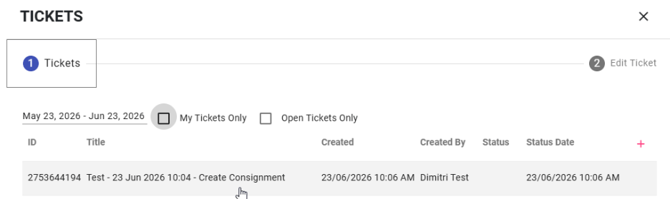
At this stage:
- The ticket has been logged
- Cario Support has been notified
- The screenshot and available diagnostic information have been attached
- The issue can now be reviewed and investigated
How to View an Existing Ticket
Open the Tickets window and select the ticket you want to review.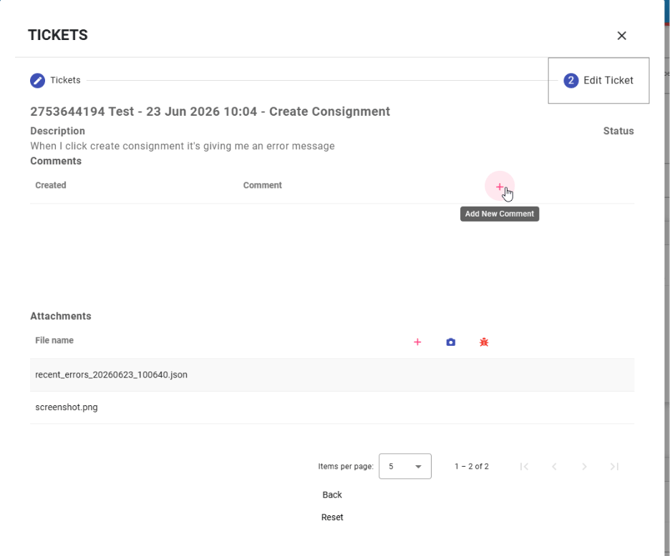
The ticket details screen displays:
- Ticket ID and title
- Description
- Current status
- Comments and updates
- Attached files
- Screenshots
- Error logs
This screen provides a history of the issue and the communication between the user and Cario Support.
How to Add a Comment
You can add more information after the ticket has been created.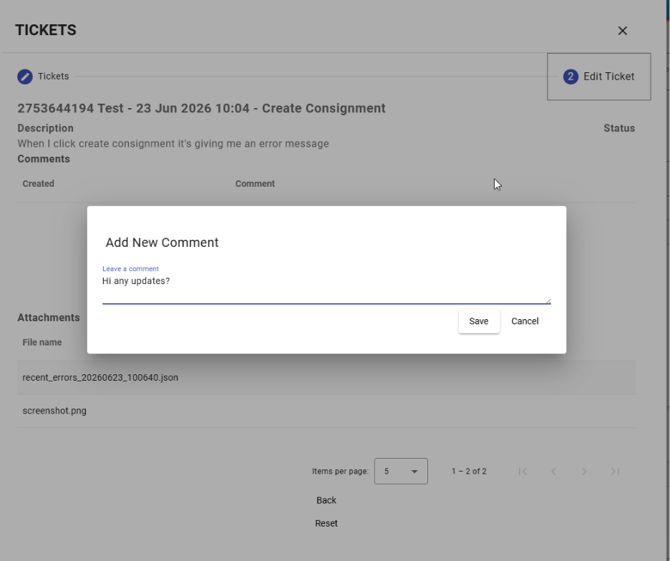
This can be useful when:
- The issue happens again
- You discover another affected consignment
- The impact has changed
- Cario Support asks for more information
- You want to provide an update
To add a comment:
- Open the ticket.
- Click the plus icon in the Comments section.
- Enter the additional information.
- Click Save.
The new comment will be added to the ticket history.
Cario Support can also add comments and updates to the same ticket.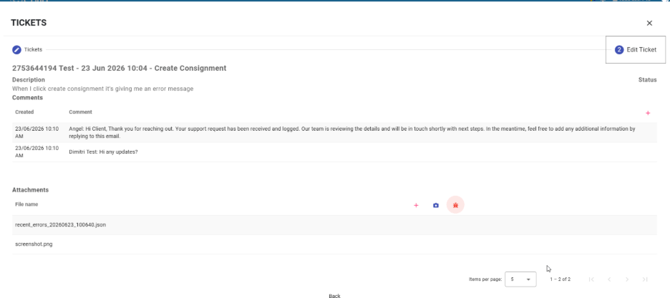
How to Add Supporting Files
Additional files can be attached to an existing ticket.
Supported attachments can include:
- Images and screenshots
- Video recordings
- Excel spreadsheets
- CSV files
- PDF documents
- Word documents
- Other relevant file formats
To add a file:
- Open the ticket.
- Go to the Attachments section.
- Click the plus icon.
- Select the file from your device.
- Upload the file to the ticket.
Use attachments when they provide useful evidence or additional information that cannot be explained clearly in the description.
How to Attach the Current Screenshot
The Attach Current Screenshot option allows you to capture the Cario screen currently open in your browser.
To attach the current screen:
- Open the relevant ticket.
- Click the camera icon in the Attachments section.
- Select the Cario browser tab if prompted.
- Click Allow.
- Confirm the screenshot attachment.
This is useful when the error appears again after the ticket has already been created.
How to Attach a Recent Error Log
Cario records certain recent technical errors from the user’s device.
These logs can help Cario Support identify the request that failed and the response returned by the system.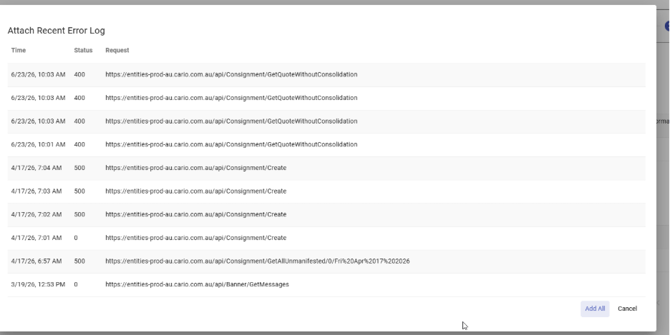
To attach a recent error log:
- Open the ticket.
- Click the error log icon in the Attachments section.
- Review the list of recent errors.
- Locate the error that matches the date and time of the issue.
- Select the relevant entry.
- Click Add, or select Add All if requested by Cario Support.
The available information may include:
- Date and time
- Error status
- The affected Cario request or process
For example, a recent error may relate to:
- Creating a consignment
- Requesting a carrier quote
- Loading unmanifested consignments
- Retrieving platform messages
Select the error that most closely matches the issue being reported.
Tip: If you are unsure which error to choose, attach the entries that occurred at the same time as the issue.
Ticket Updates and Email Notifications
When a ticket is created, Cario Support is notified and can begin investigating the issue.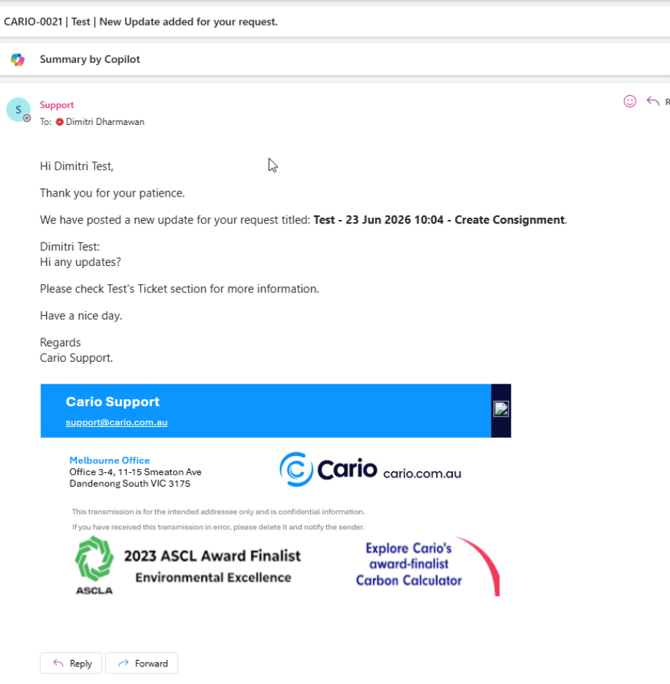
Updates may be provided through:
- Comments inside the Cario ticket
- Email notifications sent to the ticket creator
You may receive an email when:
- The ticket is created
- Cario Support adds an update
- More information is required
- The issue has been resolved
- The ticket is closed
The email will reference the relevant ticket and direct you back to the Tickets section in Cario for more information.
Important: Email replies do not update the Cario ticketReplying directly to a ticket notification email will not automatically add your response to the ticket inside Cario.
To ensure your update is recorded against the correct ticket:
- Open Cario.
- Open the Tickets window.
- Select the relevant ticket.
- Add your response using the Comments section.
This keeps the complete issue history available to both your team and Cario Support.
Understanding Ticket Statuses
The ticket status shows the current progress of the support request.
Depending on the stage of investigation, a ticket may appear as open, in progress or completed.
When the issue has been resolved:
- The ticket status will change to Done
- The updated status will appear in the Cario ticket list
- The status date will be updated
- An email notification may also be sent confirming that the ticket has been closed
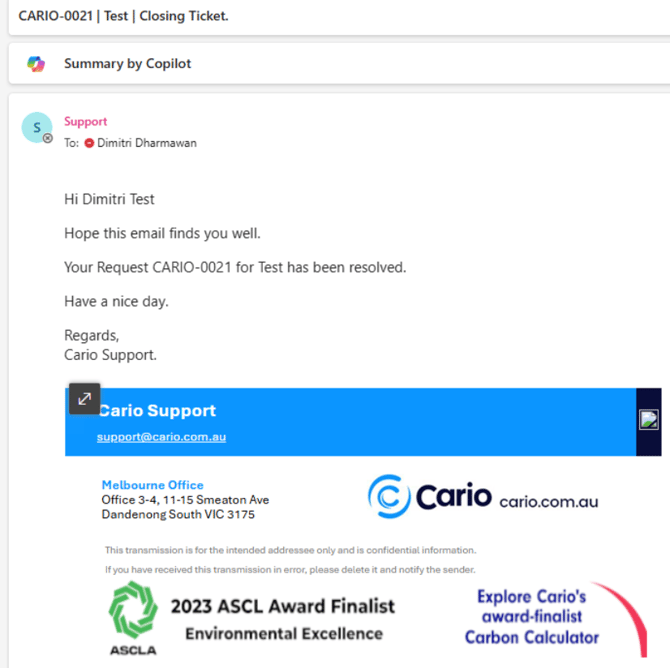
You can use Open Tickets Only to hide completed tickets and focus on requests that are still being investigated.
Filtering the Ticket List
The Tickets window includes two filters that help you control which support requests are displayed:
- My Tickets Only
- Open Tickets Only
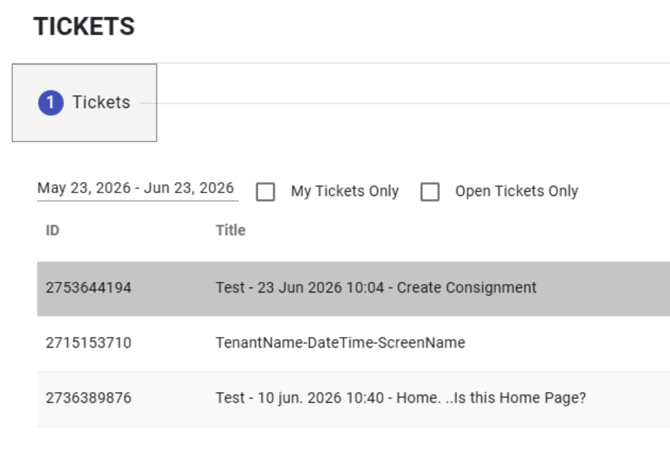
Select My Tickets Only to display only the tickets created by your user account.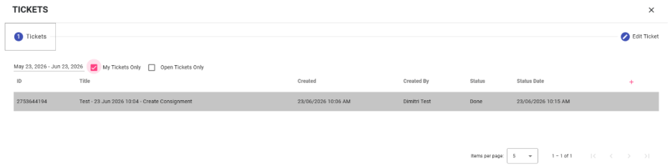
If this option is left unchecked, the ticket list will display tickets created by all users within your Cario tenant.
This is useful when:
- You only want to review issues you personally submitted
- Multiple users within your organisation create support tickets
- You want to quickly locate your own open or completed requests
Leave the option unchecked when you need visibility across all tickets raised by your organisation.
Open Tickets Only
Select Open Tickets Only to display tickets that are still active and require further investigation or action.
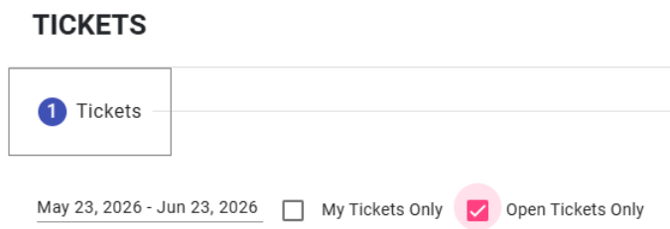
This helps you focus on current support issues without completed tickets appearing in the list.
If Open Tickets Only is left unchecked, Cario will display the full ticket history within the selected date range, including tickets with a status of Done.
Use this option when you need to:
- Review previously resolved issues
- Check the outcome of an earlier support request
- View the complete support history for your tenant
- Confirm when a completed ticket was closed
Using Both Filters Together
You can select both filters at the same time.
For example:
- My Tickets Only selected + Open Tickets Only selected: Displays only your active tickets
- My Tickets Only selected + Open Tickets Only unselected: Displays your full ticket history
- My Tickets Only unselected + Open Tickets Only selected: Displays all active tickets across the tenant
- Both filters unselected: Displays the full ticket history created by all users within the tenant
You can also adjust the date range to narrow the ticket list to a specific period.
Tips for Creating a Useful Support Ticket
To help Cario Support investigate the issue efficiently:
- Create the ticket while the error is still visible
- Use a clear and specific ticket title
- Explain what you were attempting to do
- Include any consignment, quote, manifest or order references
- Select the correct impact level
- Attach a screenshot
- Attach the relevant recent error log
- Include the date and approximate time the issue occurred
- Add further updates directly through the Cario ticket
- Avoid creating multiple tickets for the same issue
Providing complete information when the ticket is created can reduce investigation time and help the support team identify the cause more quickly.
Summary
The Cario ticketing system provides a central place to report, track and manage support requests directly inside Cario.
Users can:
- Create support tickets without leaving the platform
- Capture the current Cario screen
- Attach recent error logs
- Upload documents, images and videos
- Add comments and additional information
- Review the history of an issue
- Receive updates from Cario Support
- Track the ticket through to completion
By creating the ticket while the issue is still visible and attaching the available diagnostic information, users can give Cario Support the context needed to investigate the issue effectively.