![Cario logo RGB blue-1.png]](https://knowledge.cario.com.au/hs-fs/hubfs/Cario%20logo%20RGB%20blue-1.png?height=50&name=Cario%20logo%20RGB%20blue-1.png)
-
Customer Service
1.1 Consignment Status Basics and Advanced
1.1.1 How to request additional information on a consignment
1.1.2 How to check if ASN email has been send to the customer?
1.1.3 How to add manual note to a consignment
1.1.4 How to update an ETA on a consignment
1.1.5 How to email the POD?
1.1.6 How to export data to CSV -
Differences between Consignment Status Basic and Advanced
2.1 Explanation of the symbols and colours
2.2 Drag a column
2.3 Filter on a column
2.4 Search on a column
2.5 Progress of a consignment
2.6 Quick access to the option consignment details
2.7 Quick access to consignment not on board for delivery or delivered -
-
Under the option ‘Customer Service’ you have the following options
- Consignment Status (Basics)
- Consignment Status (Advanced)
- Invoice Lookup
1. Consignment Status Basics and Advanced
- In both options you have several options:
Searching and tracking on your consignments, such as POD and estimate charge - Copying your consignments
- Requesting an update on your consignments
- Export data to CSV-file
Steps to follow:
- Login to Cario
- Click on ‘Customer Service – Consignment Status’ (basic) on the left-hand side
The following menu option will appear:
- ‘Filter’ field: you can search on reference number on your consignment or leave it empty
Note: Searching on this field: you need to change the date to the correct manifest date of the consignment, otherwise no data will be returned - ‘Choose a date’ field: you change the date range by clicking in the date
It will automatically show today’s date. However, you can change the ‘From date’ and ‘To date’. - ‘Consignment/Ref/Barcode’ field; you can enter 1 consignment or 1 reference to search or leave it empty
Note: Searching on this field: you don’t need to change the date when enter the correct number of the consignment or reference - The correct consignment will be shown

Explanation of the columns:
-
≡ = several options available
-
Connote = consignment number
-
Carrier = carrier for this consignment
-
Pickup address = collection address
-
Delivery address = delivery address
-
Date = manifest date
-
Service = the carrier/courier for this consignment
-
Reference = the reference number for this consignment
-
Type = for future use
-
Itm = the total number of the freight items
-
Kg = the total kg of the freight
-
M³ = the total volume of the freight
-
Status = location of the consignment
-
Created = consignment is created
-
Manifested = consignment is manifested
-
Pickup = consignment is collected
-
OBFD = consignment is on board for delivery
-
Transit = consignment is travelling
-
Del = consignment has been delivered
-
Carrier = consignment has been created for invoice purposes
-
Note= a note is added to the consignment
-
Dexception = for this consignment extra information is required
-
Exception = this consignment is on an exception report and is under
investigation
-
Note = Manual updated information on this consignment
-
-
Net charge = the total amount excl GST
-
⚠ this consignment contains dangerous goods
-
ETA = The Estimated Time of Arrival

-
-
≡ (or actions)
When select actions more options are available
-
Consignment details
-
Consignment Estimate
-
Copy Consignment
-
Request update
Explanation per option:
a. Consignment details
-
-
If consignment has been delivered and POD is available this will be shown on
the first tab. If there is no POD available, the first tab will be shipping units.
-
Shipping units = the freight details of the consignment
-
Events = the detailed status information of the consignment. (Select All: the
detailed status information of the consignment in abbreviations of the
carrier)
-
Request update = in this screen you can send an email to Freight People
asking for information regarding this consignment
-
Address = collection and delivery address of this consignment
-
-
Consignment Estimate = the estimate cost of the consignment.
-
Copy Consignment = this will then open a ‘Create New’ consignment screen and all
the consignment details would have copied across, modify any fields as required and click on [create]
-
Request update = in this screen you can send an email to Freight People Customer
Service asking information regarding this consignment
-
1.1 How to request additional information on a consignment
After retrieving the correct consignment on the screen, you have the possibility to request updates on this consignment.
Steps to follow:
- Click on
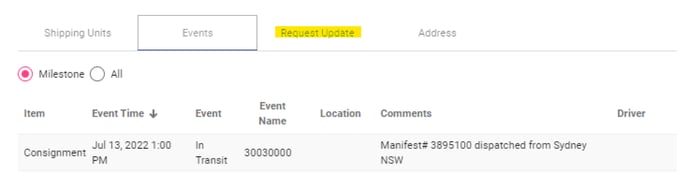
- Select ‘Consignment details’ and check the events tab for the latest status of the consignment
- Go to tab ‘Request Update’
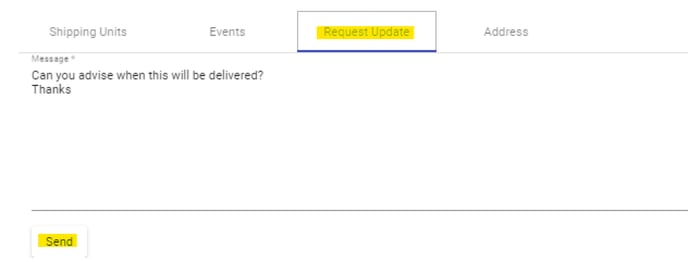
- Add your message and select [send]
-
Freight People Customer Service team will respond to the email address linked to your login credentials
1.2 How to check if ASN email has been send to the customer?
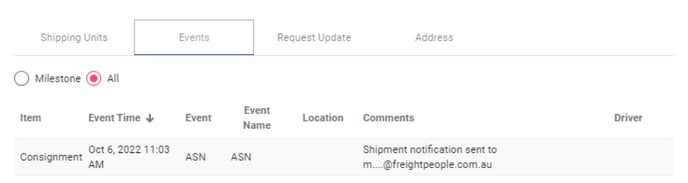
When an ASN ((Advanced Shipping Notification) is sent (or attempted to be sent) it creates a
Consignment Event that is displayed in the Consignment tracking.
If there is an error sending the ASN then the error is displayed in the Comments. If an error occurs, Cario retries however they do not “continue” to retry again if it continues to fail.
If successful, the Email address it was sent to is displayed showing the first letter and the domain of the email address. This is for security reasons.
It is not a milestone event, so you need to use the “all” option to see the event.
5.1.3 How to add manual note to a consignment
After retrieving the correct consignment on the screen, you have the possibility to add a manual note on this consignment.
Steps to follow:
- Select consignment using the checkbox
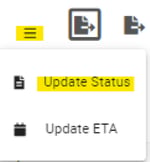
- Go to the right top on the screen and click on
- Select ‘Update Status’
- The following pop-up screen will appear
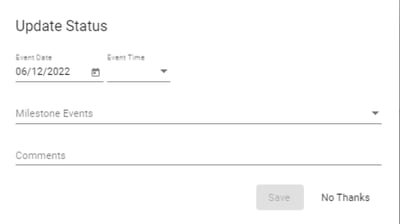
- All the fields need to be entered:
- Select correct event date and time
- Use dropdown arrow on milestone events and choose ‘Manual Note’
- Comments: there are a couple of standard comments, otherwise add your own note
- Select [save]
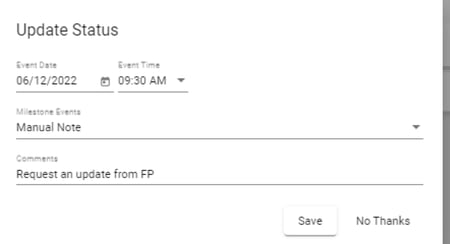

When the carrier will transfer another event scan (eg delivered) the status NOTE will be updated to DEL.
1.4 How to update an ETA on a consignment
After retrieving the correct consignment on the screen, you have the possibility to update the ETA on this consignment.
Steps to follow:
- Select consignment using the checkbox

-
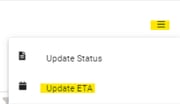
Go to the right top on the screen and click on ≡
- Select ‘Update ETA’
-
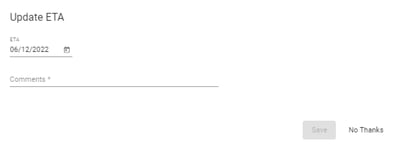
The following screen will appear
-
All the fields need to be entered
- ETA = new ETA
- Comments = additional information
- Select [save]
The ETA will be updated for this consignment.
This options ‘Update Booked in Date’ and ‘Email Delivery Exception Report’ is only for Freight People.
1.5 How to email the POD?
After retrieving the correct consignment on the screen, you have the possibility to retrieve the POD for this consignment.
Steps to follow:
- Click on ≡
- Select ‘Consignment details’ and check the events tab for the latest status of the consignment
- The POD will be displayed on the first tab
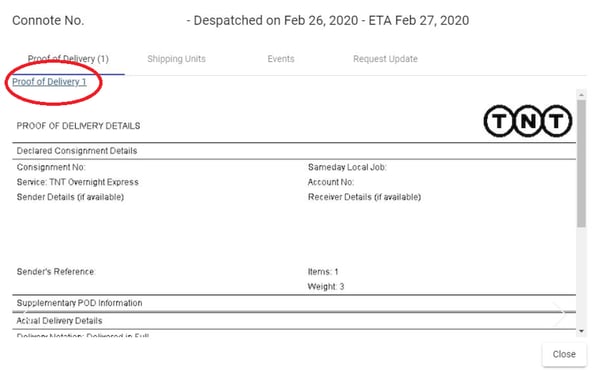
- Click on the blue part ‘Proof of Delivery’ and the POD will be open on a separate tab
- Save the POD and attach to your email
1.6 How to export data to CSV
After all the data is on the screen, go to the right-hand top side of the screen there is 2 options for exporting to CSV. You can choose what data you like to export. Each CSV file has different columns.
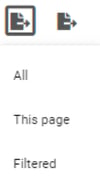
- All: all the records from the selection criteria
- This page: only the records that are displayed on the screen
- Filtered: when using the option ‘filter’, only these records will be exported
2. Differences between Consignment Status Basic and Advanced
Both menus have the same results however in menu option ‘Consignment Status (Advanced)’ the look-and-feel is different.
Each column you can search, and you can drag a column header to group that column. Also, for each consignment you can see the progress of the consignment.
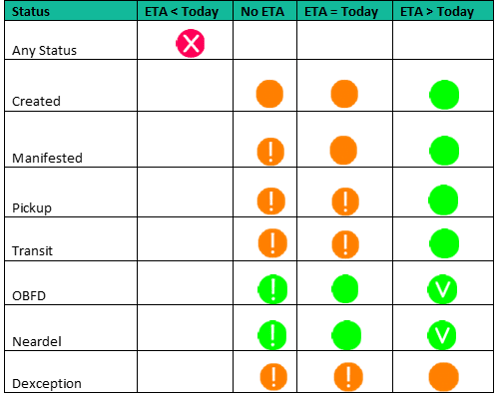
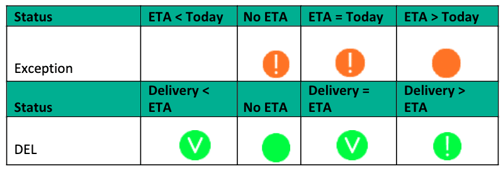
2.1 Explanation of the symbols and colours
In the columns between ‘Progress’ and ‘Status’ are symbols and colours displayed.
Explanation of these symbols:
2.2 Drag a column
Select a column eg delivery state
And drop the column on the top
The data will be displayed sort by delivery state
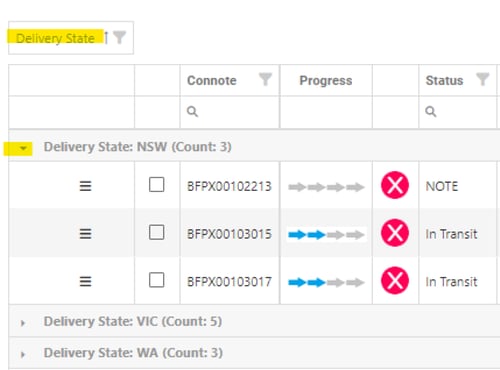
You can click on the dropdown arrow before delivery state, and it will be displayed all the
consignments going to that state.
2.3 Filter on a column
On the columns with a filter symbol  you can add a specific filter for eg column delivered.
This works the same as in Excel.
- Click on the filter
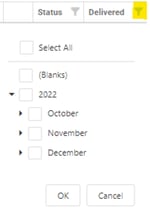
- Select ‘blanks’ and [ok]
- All the consignments without a delivery date will be displayed
2.4 Search on a column
On the columns with a magnifying glass symbol you can search for a specific criterion eg delivery company.
Go to column ‘delivery locality’ and add the name of the delivery company

2.5 Progress of a consignment
In columns ‘Progress’ you have a quick view of the status of the consignment.
Hovering over the column you can see the status of the consignment. However, on the next 2 columns you have also this extra information.
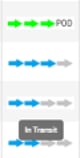
You can also see which consignments have a POD attached.
2.6 Quick access to the option consignment details
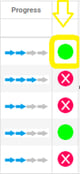
Instead of selecting actions - consignment details you have quick access to the same option
using the symbol in column next to ‘Progress’.
2.7 Quick access to consignment not on board for delivery or delivered
Steps to follow:
- Open menu option ‘Customer Service – Consignment Status (Advanced)’
- Select button [Not OBFD or DEL last 28 days]
- All consignment with status ‘Pickup’/ ‘In transit’ / ‘Exception’ / ‘Other’ for the last 28 days
will be displayed - In the top of the screen, you can see how many consignments of each status

3. Invoice Lookup
In this menu option you can find all your invoices.
Steps to follow:
- Login to Cario
- Click on ‘Customer Service – Invoice Lookup’ on the left-hand side
The following screen will be displayed.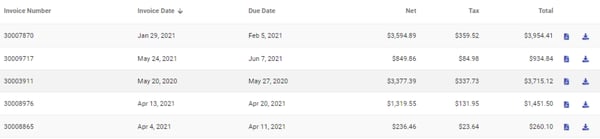
- You can sort each column by clicking on the column name
- On the right-hand side, you have 2 icons, 1 for CSV and 1 for PDF where you can download your invoice.