![Cario logo RGB blue-1.png]](https://knowledge.cario.com.au/hs-fs/hubfs/Cario%20logo%20RGB%20blue-1.png?height=50&name=Cario%20logo%20RGB%20blue-1.png)
Under the option ‘Consignments’ there are several menu options:
- Create a new consignment
- Maintain a consignment
- Today’s List (Basic)
3.1 Today's List
3.2 Important Consignments - Today’s List (Advanced)
- Manifest
- Pickup Request
- Booking / Manifest History
1. Create a New Consignment
In this menu option you can create a consignment for each freight.
Steps to follow:
- Login to Cario
- Click on ‘Consignments – Create New’ on the left-hand side
- ‘Deliver To’ screen will be displayed automatically
- Enter at least 3 characters, so the saved address will be shown
- Or enter a new delivery address (the address details will be saved for future use)
- For residentials delivery, select checkbox ‘Residential’, if required, you can also select ATL (Authority to Leave)
- If you have special delivery instructions, please enter the information in ‘delivery
instructions’ (this information will be printed on the label and consignment) - You can also select ‘Tail lift’ or ‘Hand unload’
- Your sender address (Collect from) are entered with your own address details.
- To change this, click on the [modify] button next to ‘Collect from’
- For residentials collection, select checkbox ‘Residential’, if required, you can also
select ATL (Authority to Leave) - If you have special pickup instructions, please enter the information in ‘pickup
instructions’ (this information will be forwarded to the carrier) - The same for ‘Tail lift’ (this information will be forwarded to the carrier)
- For additional delivery requirements such as ‘hand unload’, ‘timeslots or ‘tailgate’, click on [more options] on the top right on the consignment screen
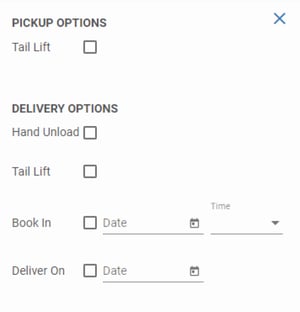
- In fields ‘Customer reference’ and ‘other references’ you can enter specific reference
information for this consignment (this will be printed on the label and consignment) - Enter the collection date and time (default is today’s date)
- In field ‘Special instructions’ you can enter some extra instructions. This will be printed on the label and consignment
- Enter in Shipment Dimensions & Weight the details of your freight

Explanation of the screen:
- Product: you can use predefined shipments of the same items you send each time.
This will save time when creating more connotes - Container: what kind of freight is it
- Reference: you can add a reference to each container (when enter details in #6,
these are copied to this field, however you can overrule it) - Quantity: how many containers of each sort
- Weight(kg): the weight in kilos per container
- Length(cm): the length in centimetres per container
- Width(cm): the width in centimetres per container
- Height(cm): the height in centimetres per container
- Volume(m3): this field is calculated automatically after entering the dimensions
- Haz Mat: only available when using Dangerous Goods
- Assets: for future use
- Trashcan: delete the row
- Product: you can use predefined shipments of the same items you send each time.
After entering the ‘container’ type the background of the line will turn grey. It will stay grey until you entered all the mandatory fields. The [create] and [create and manifest] button is inactive.
(Tip: use the [Tab] button to enter all the fields)
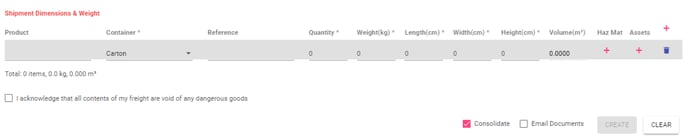
If you enter the product code the fields container / quantity / weight / length / width / dangerous goods if applicable is automatically set. You can always change the quantity and the other fields.
If container type doesn’t have the correct volume (m³) the field becomes red and [calculate] is greyed out.

Error message: the volume of the item you are sending is less than 0.001m³ indicates that the dimensions may not be correct. Volume should be at least 0.01m³. Please change the dimensions to ensure the volume is 0.01m³ or higher
If the dimensions are incorrect (for examples entered in mm instead of cm) you receive a warning message, and the specific field is marked as yellow. The option [calculate] is available.

Warning message: the value you have entered for length (or width, height) is larger than would normally be expected – 1 meter. Dimensions are always entered in centimetres (cm). Please check you have entered the correct value as incorrect dimensions will result in high freight charges
If you need to change the dimensions or weight on the line, you can click in the field and edit the entered quantity. However, after entering all the mandatory fields, a new line is added automatically to the grid and the background will turn back to white and all the buttons are active.
Checkbox ‘Consolidate’: If selected this consignment will be consolidated/merged with any
unmanifested (created) consignments where the delivery address and carrier details are an exact match. However, you can always choose not to consolidate the consignment.
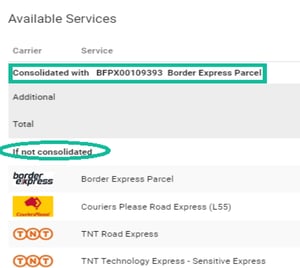
Checkbox ‘Email documents’: if selected the paperwork will be sent, enter the correct email address on the populated screen.
Button [Clear]: if select this button the screen will be cleared.
- If you have dangerous goods to deliver, click on red plus-sign under the field name Haz Mat before adding the freight. When adding dangerous goods, you need to create the Hazardous Materials first, before adding them to the consignment.
- A pop-up screen will appear where you can enter the dangerous goods quantity
- The data grid is also changed and works the same as the data grid for entering shipment dimensions
- To accept the dangerous goods line, click on the [OK] button
10. Click on [Create]
11. A range of different carrier services will be displayed.
-
- The cheapest carrier is presented as the first carrier in the list and is high-lighted in green.
- The fastest ETA is high-lighted in blue 12. Select the correct service and click [OK]
12. Optional is adding reference fields and special instructions
The labels and consignments will be pop-up in separates screens, except when selecting the
checkbox ‘Email documents’.
Note: if you need to make a return, you can use the menu option ‘consignments - return’. Your own address will automatically be filled in the ‘deliver to’ fields and the other steps are the same as the menu option ‘Create new consignment’.
2. Maintaining a Consignment
In this menu option you can maintain consignments which have the status ‘created’, not
‘manifested’.
Steps to follow:
- Login to Cario
- Click on ‘Consignments – Maintain’ on the left-hand side
- Search the correct consignment
- You can modify the consignment
- You can delete the consignment
- To modify: click on the pencil on the right-hand side
- You can modify references fields / shipment dimensions and weight (you are not
able to change the carrier)
- You can modify references fields / shipment dimensions and weight (you are not
- To delete: click on the trashcan sign on the right-hand side
3 Today’s List (Basic)
There are 2 options:
- Today’s list
- Import Consignment
3.1 Today’s list
This is an overview of all unmanifested (created) consignment (for any date) and all consignments manifested today.
The consignment number has a hyperlink, only for unmanifested (created) consignments. This is a shortcut to print the label.
The following options are available:
- Estimate cost of your consignment
- Print label of your consignment
- Printing your consignment
- Email consignments
- Copying your consignments
Steps to follow:
- Login to Cario
- Click on ‘Consignments – Today’s List on the left-hand side
- Search the correct consignment
- To check estimate cost
- Click on the dollar-sign on the right-hand side
- pop-up screen will be shown with the estimate cost of the consignment
- To print label:
- click on the barcode-sign on the right-hand side or on the hyperlink
- pop-up screen will be shown with the label
- print label
- To print consignment:
- click on the printer-sign on the right-hand side
- pop-up screen will be shown with the consignment
- print consignment
- To email consignment:
- click on the envelop-sign on the right-hand side
- pop-up screen will be shown where you can enter the email address and subject
- click on send
- To copy consignment:
- click on the documents-sign on the right-hand side
- this will then open a ‘Create New’ consignment screen and all the consignment
details would have copied across. - modify any fields as required
- click on [create] (new consignment will be created
3.2 Import Consignment
In this option you can bulk import consignments.
Steps to follow:
- Login to Cario
- Click on ‘Consignments – Today’s List on the left-hand side
- Select ‘Import Consignments’
- To obtain the template, click on the 'Export to CSV' button to the right of the screen:
- Open the CSV file to enter all the consignment information

Explanation of the fields:- Reference: you can add a reference to each container (optional)
- Name: Delivery company name, max 30 characters, no special characters (mandatory)
- Line1: Address line 1 of the delivery company, max 30 characters, no special characters
(mandatory) - Line2: Address line 2 of the delivery company, max 30 characters, no special characters
(optional) - Locality: suburb (mandatory)
- State: State (mandatory)
- Postcode: Postcode (mandatory)
- Country: Australia (Cario only supports national freight)
- Contact: contact name, max 30 characters (optional)
- Phone: Telephone number, numeric and only the characters – ) allowed (optional)
- Mobile: Mobile number, numeric and only the characters – ) allowed (optional)
- Email: email address, only 1 allowed (optional)
- AllowATL: FALSE (mandatory)
- IsResidential: FALSE or TRUE - is the address a residential address (mandatory)
- IsPostal: FALSE (mandatory)
- RequireHandUnload: FALSE or TRUE (mandatory)
- RequireTailLift: FALSE or TRUE (mandatory)
- DeliveryInstructions: delivery instructions, max 100 characters, no special characters
(optional) - Quantity: quantity (mandatory)
- ContainerType: Containertype, for example: Carton, Pallet (see the list in create
consignment screen) (mandatory) - Length: the length in centimetres per container
- Width: the width in centimetres per container
- Height: the height in centimetres per container
- Weight: the weight in kilos per container
Note: You will need to ensure that the locations are validated (Locality, State, Postcode) and that the max field lengths are not exceeded.
- Select the Cheapest Service, or choose a specific service from the drop-down list, and select the Container type and Cost Centre

- Click on the 'Import File' button to the right of the screen:
- Select the correct file – select [open]
- Select [upload]
The consignment number will be populated on the left-hand side. If the consignment cannot be created, it will return in red. -
How to resolve the error consignment
-
Click on the pencil (edit) on the left-hand side
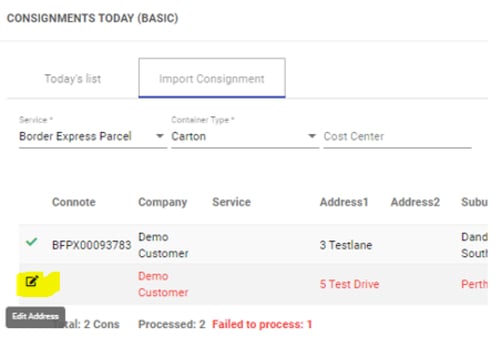
In this example the State is incorrect

-
Override the location and select the correct one from the drop-down list
-
Select [OK]
-
- The consignment will be created
4. Today’s List (Advanced)
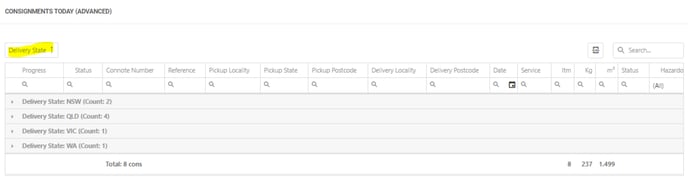
In this menu you have the same information as on the menu option ‘Today’s List (Basic)’ only the lay-out is different.
With this lay-out you can drag and drop a column header to group that column.
5. Manifest a consignment
In this menu option you can manifest your created consignments. You can manifest all consignments at once.
When manifest a consignment this will result in sending a pickup request and manifest details to the carrier.
Steps to follow:
- Login to Cario
- Click on ‘Consignments – Manifest’ on the left-hand side
- Select the checkbox of the consignment(s) you would like to manifest or use the checkbox at the left-hand side of the screen.
- Click on [Manifest]
If needed, you can also change the manifest date (pickup date) by selecting the calendar option in the field [pickup date]
6. Pickup Request
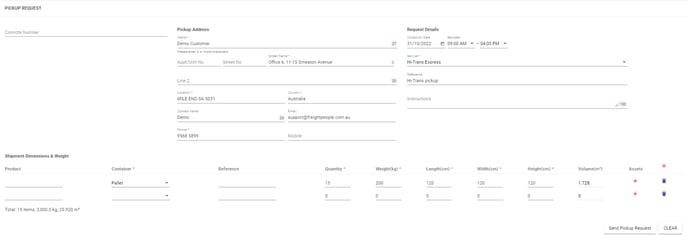
You are able to send a pickup request to a carrier before creating all the consignments.
Steps to follow:
- Login to Cario
- Click on ‘Consignment – Pickup Request’ on left-hand side
- Enter all the information, you don’t have to enter a consignment
-
Click on [send Pickup Request]
7. Booking/Manifest History
In this menu option is an overview of all manifested consignments, displayed per manifest date. It will automatically show today’s date.
The following options are available:
- Print manifest
- Print consignment
- Print label
- Print hazardous materials
- Assets
- Resend
- Resend pickup request
Steps to follow:
- Login to Cario
- Click on ‘Consignment – Booking/Manifest History’ on left-hand side
- Enter the consignment in the correct field ‘Connote/Ref/Barcode’
- The correct manifest which belongs to this consignment will be shown

Explanation of the columns:
-
-
≡ = several options are available under actions
-
Manifest No = number of the manifest
-
Created date = date of the created consignment
-
Pickup date = collection date of all the consignments in this manifest
-
Pickup address = collection address of all the consignments in this manifest
-
Carrier = the service (carrier/courier) for this manifest
-
Consignments = the total of consignments in this manifest
-
Weight = the total weight of the consignments in this manifest
-
Volume = the total volume of the consignments in this manifest
-
Status = The status of the manifest
-
-
-
When selecting ‘manifest’ or ‘booking’ on the top of the screen the actions are:
- Print manifest
- Print consignment
- Print label
- Print hazardous materials
- Assets: for future use
- Resend (only for Freight People use)
Note: Checkbox ‘Failed Manifests’: only for Freight People use.
Note: Checkbox ‘Future Dated Bookings’: only for Freight People use - On the right hand-side, you can also export the data to a CSV file
If you manifest after the cut-off time, this will be result in a failed booking/pickup request to the carrier. Our Customer Service team will monitor this menu option for several times a day.